Posts

Showing posts from November, 2022

Introducing the Newest Letterboxer... Freya

Image
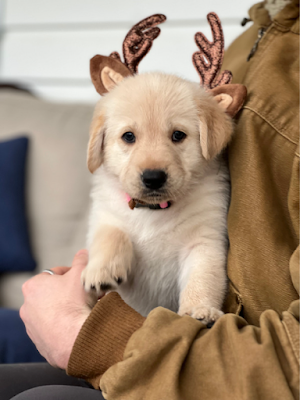
I am VERY excited to share that our family is growing by 4 paws! Freya (FRAY-uh) is our new puppy, and we are very excited for her to be joining our family. She is a Golden Retriever/German Shepherd Mix (Golden Shepherd) and was born on October 20th. We got to meet her for the first time yesterday, and she is just the cutest little puppy! We had puppy playtime (which was actually puppy naptime) yesterday, and Dylan and I were happy as can be. It was funny because she makes a little moaning sound while she sleeps - literally the entire time. I doubt she'll be sleeping in our room while that's still happening. She is certainly going to bring a little light into our lives, and we are so excited to be dog parents. The thing we are most excited to do with her is to take her letterboxing. She can't walk far while she's still so small, but the second we can take her on a little bit of a longer walk, we'll bring her boxing with us. She already has her own AtlasQuest account

Carve December 2021 In Review

Image
We are almost a week out from the first of December, and it means that Carve December is quickly approaching. It seems like the perfect opportunity to revisit the product of Carve December in 2021. Carve December is hosted by Julie Fei-Fan Balzer @balzerdesigns on Instagram. Every day, you carve a stamp based on a prompt and share it on Instagram. It's an excellent way for the stamp carving community to gather and carve together. It's kind of funny how different everyone's brains work, and it really shows when you look back at what everyone's made. Last year was the first year I participated, and I'm looking forward to playing again this year. You can see last year's prompts by clicking on this link.  The images below are my final product in order of the day for 2021. My favorite of the carves would probably be day 9's carve: Jovial. It's a rather simple image, but it fits the prompt well. It's a beautiful flower and every time I look at it, I feel

How I Carve Images From My Photos

Image
It's really easy to carve an image from clip art or a drawing, but what about my personal photos. I've carved three images from pictures I've taken/someone has taken for me. These images end up being the most personal images that I have. All you need for this project is the Adobe Capture App and a photo you want to carve. Below is the process I used for carving an image of my mom's dog, Bruno, for the 2021 Carve December prompt, "Playful". 1. Select the photo you want to carve. The best photos for carving have a slightly higher contract and if you were to make the photo black and white, you wouldn't lose any of the information in the photo. This photo of Bruno could have been better! He's a similar color to the floor, so the app couldn't always differentiate him from the carpet. I ended up correcting this by carving a positive image and not giving him a body outline. 2. Open the Adobe Capture App and go to libraries. From there click the bubble in

The ...AND!... Event

Image
This past weekend, I attended the ...AND!... event hosted by Tree Knocker and Paper Trail. The weather was perfect, which was a pleasant surprise for a November event, and it was so peaceful walking around listening to the leaves falling. I walked with PiggyJaunt, and it was great to catch up and chat. The stamps all had one thing in common, the letters A, N, and D were in the word consecutively. The stamps were carved at such a high-quality level, and everything was clear and clever. I think my favorite stamps of the event were "Propag and a" "Yankee Doodle D and y" or "C and y Shop." The Propaganda stamps featured one of Doctor Suess's Propaganda posters with Hitler on it. The wording was carved so perfectly! The Yankee Doodle Candy was an original image (I believe) of a patriot holding a flag. The Candy Shop was an incredibly detailed image of a candy store. I was highly impressed with the detail of how they carved the candy so small yet clearly. I&

Making My Mom a New Teacher Stamp

Image
  My mom is a second-grade teacher in the Stafford County Public School System. She loves teaching, even though parents and some kids can be difficult. I've made her a stamp before with a Monarch butterfly that read "Loveday" above it. That used to be her last name, but last year, she remarried, and her last name changed to "Bowles." She uses the stamps for her classroom books, and to mark items in her class as hers. It prevents confusion, especially at the end of the school year when she has to pack. She requested I make her a new Bowles stamp a few weeks ago, and I'm ready to share the final result! Though she only requested one, I decided to deliver two. The first, of course, is the Monarch butterfly. This image is different, however from the previous one because the name is displayed in the middle of the butterfly and not the top. It's much more elegant compared to the previous one (which was my first time seriously attempting lettering, by the way.)

How to Make a Personal Logbook in 10 Easy Steps

Image
I've recently started my fifth logbook! and it means it's time to make the next logbook so that it is available when I need it. My current logbook is a resin, color-shift dragon eye cover book that I made myself using mold, resin, and mica powder. I bound the pages together using a Coptic stitch and green waxed thread. I'm going to be using the same stitch on a Flamingo Party Logbook that I'll be making but will be making a different style cover than I had used for the Dragon Eye Logbook. For this project I will be using the following materials: 65lb Cardstock Paper (doesn't have to be white);  for the signatures Waxed Cotton Round Cord for Bookbinding; for the Coptic stitch Bone Folding Tool, optional; can make folding the papers easier Decorative Paper at least 7x10 and Flexible Enough to Fold Cooperatively; for the cover ThunderBolt 5.5 x 8.5-inch Chip Board;  To make the cover sturdy  Single Piece of Decorative Paper, optional; for the book spine decoration Tack