How I Carve Images From My Photos
It's really easy to carve an image from clip art or a drawing, but what about my personal photos. I've carved three images from pictures I've taken/someone has taken for me. These images end up being the most personal images that I have. All you need for this project is the Adobe Capture App and a photo you want to carve.
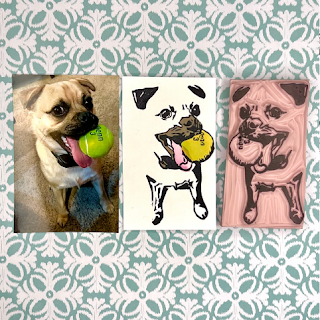
Below is the process I used for carving an image of my mom's dog, Bruno, for the 2021 Carve December prompt, "Playful".
1. Select the photo you want to carve. The best photos for carving have a slightly higher contract and if you were to make the photo black and white, you wouldn't lose any of the information in the photo. This photo of Bruno could have been better! He's a similar color to the floor, so the app couldn't always differentiate him from the carpet. I ended up correcting this by carving a positive image and not giving him a body outline.
2. Open the Adobe Capture App and go to libraries. From there click the bubble in the bottom right with a box and an arrow pointing into the box from the left bottom corner. Import the image.
3. Scroll on the effects slider until you see "shapes" This will give you the desired Black/White effect. Now you can slide the slider left and right to change the intensity of the photo.
4. Some images require more than one reference photo. For Bruno's photo, I used three photos to get the desired final image. I used a "dark" image to get the details on the ears, a "medium" photo to get details on the mouth, ball, and legs, and a "light" photo to get information on the facial features. It's ok to have more than one image so long as you don't change the size of the photo or crop the image in any way.
5. Time to trace. I usually start tracing my photos from the hard parts to the easy parts because if I mess up a hard part, I won't feel like I've wasted my time after completing the easy part. The tracing method for me improved greatly after investing in a tracing board. After that purchase, it became much easier to pick up on detail and get the image I was looking for.
6. Carve the image and stamp it. (This is the good part).
7. Color in the image, optional. I love adding just a hint of color to my images, so for Bruno's stamp, I painted his mussel, his ball, and his tongue.


Comments
Post a Comment